
With my wedding only 3.5 months away, I have started my wedding diet. Since crash diets don't work for me, I had to make changes to my daily diet that I could maintain over a long period of time. The biggest change I have made is around breakfast. I adapted a recipe from the South Beach Diet, which has really helped. It's a breakfast frittata, which I make on Sunday, parcel out into individual Tupperware containers, then I take one to work each day. It's filling, tasty, and very satisfying. I find that when I have one of these frittatas for breakfast I can have a later and smaller lunch, which leads to a small, early dinner. So all in, I think that I am taking in less calories, and seem to be losing about a pound a week, which isn't crazy, but sustainable. I will say, this isn't proven anywhere and may not work for everyone, but it works for me.
With that preamble, here's the recipe. Look for notes at the end of ways to mix it up..
Basic Breakfast Frittata
1-2 tsp of olive oil
1 bag frozen spinach (preferably, not chopped)
1 bag frozen broccoli
1 clove of garlic
1/2 medium onion
1 dozen eggs
1/2 cup of non-fat milk
1-2 TBS salt (optional)
pepper (as needed)
1-2 handfuls Shredded cheddar cheese (or any of your favorite cheeses)
Preheat oven to 350 degrees.
Defrost the spinach and broccoli in the microwave. They do not need to be hot, just not frozen. Ring out/drain any excess water from the vegetables. Set aside
Whisk eggs, milk, salt, and pepper, in a mixing bowl. Set aside
Heat oil in a pan. On low-medium heat cook onions until soft, lightly season with salt and pepper. Add garlic and cook for 1 more minute. Turn up heat to medium/high. Add defrosted spinach and broccoli. Saute until heated through. Add additional salt and pepper as desired.
Once vegetables are finished cooking, place them in a 6x9 inch baking dish, in an even layer. Then whisk the eggs briefly and add to dish. With a fork make sure that eggs have surrounded all of the vegetables and settled to the bottom. Then add cheese to the top of the dish in an even layer. With the back of your fork, make sure that most of the cheese is slightly submerged beneath the eggs.
Bake for 45 minutes to an hour. To test when the frittata is finished, poke a toothpick in the center of the frittata. If it comes out dry, then your frittata is finished. If it's still a a little wet, leave it in the oven until finished. Let cool for a few minutes before cutting into it.
To reheat place single service frittata on a plate and microwave for 2-3 minutes depending on thickness of frittata. Service with your favorite accompaniment.
Options:
-Sauteed mushrooms with garlic
-add a layer of frozen potatoes to the bottom
-red peppers, corn, peas, any of your favorite vegetables or leftovers will work
- bacon, sausage, ham, etc.. are also a nice addition, although not as healthy as the vege version
Showing posts with label recipe. Show all posts
Showing posts with label recipe. Show all posts
Thursday, March 18, 2010


Friday, January 22, 2010
Happy New Year
It's been a while since I've posted. To kick off the new year, I wanted to share a dish a friend and I made for new years dinner, and I have made 1 other time since. We tested it in our Tante Marie Class on Northern Italian Cooking. It was delicious, easy, and sounds fancy. Thank you Tori for the recipe!!
Also, it's great for weeknight dinner parties. You can make it the night before and just heat it up. It actually tastes better this way.
For new years we served it with a meat lasagne, an escarole salad with meyer lemon and fleur de sel, and garlic bread. The meal was easy to make and delicious. For those of you that have not had escarole, it's delicious. It has a wonderful peppery flavor, similar to endive, but not as strong. I highly recommend you try it, if you haven't already.
Without further ado... Enjoy!!
Osso Buco Classico
Serves 8
Active cooking time: 30 min.Serves 8
Inactive cooking time: 1.5 hours.
8 veal shanks
salt
pepper1/2 cup of olive oil
2 tablespoons butter2 medium onions
2 carrots, peeled and diced1 stalk of celery, diced
6 cloves garlic, minced1 cup dry white wine
1 large (28 oz.) can peeled plum tomatoes1 teaspoon dry thyme
veal/chicken broth1/2 cup minced fresh Italian parsley
grated zest of 2 lemonsPreheat the oven to 350 degrees.
On a plate sprinkle both sides of the veal with salt and pepper and set aside.
In a wide Dutch oven, melt oil and butter together over high heat. When the foam subsides, add enough veal shanks to just fill the bottom of the pan. Do not crowd the bottom of the pan. Leave enough room that the veal shanks are not touching. Brown the top and the bottom well and then set aside. To know when each side is done browning, the veal will easily separate from the pan. If it's sticking to the pan, leave it alone to brown a few moments longer. This will help to seal in the juice and create a lovely carmelization on the bottom of the pan, which will make the sauce richer. Repeat these steps until all veal shanks are browned and then set aside. If the pan gets dry, add more oil and/or butter.
In the same pan, add the onions, carrots, and celery and reduce heat to medium. Salt and pepper vegetables. Cook, stirring until soft about 7 minutes. Trust the look and feel of the vegetables. Do not go on time alone. Add garlic and a pinch of salt on top, and cook 1-2 minutes more. Pour in wine and bring to a boil, stirring. Add tomatoes, broken up with a spoon, and thyme; bring to a boil.
Return the veal shanks and any accumulated juices to the pan. If needed, add enough broth so that the shanks are almost submerged in liquid, but not covered, with liquid. Let return to a boil. Cover Dutch oven with foil then lid to create a good seal, then transfer to oven, until the meat is tender enough to fall off the bone, about 1-1.5 hours.
Transfer shanks to warm platter with a slotted spoon. Boil down pan juices until thickened, then spoon over shanks.
Mix together grated lemon zest and parsley and sprinkle some over each serving.
Return the veal shanks and any accumulated juices to the pan. If needed, add enough broth so that the shanks are almost submerged in liquid, but not covered, with liquid. Let return to a boil. Cover Dutch oven with foil then lid to create a good seal, then transfer to oven, until the meat is tender enough to fall off the bone, about 1-1.5 hours.
Transfer shanks to warm platter with a slotted spoon. Boil down pan juices until thickened, then spoon over shanks.
Mix together grated lemon zest and parsley and sprinkle some over each serving.
Thursday, June 18, 2009
Tante Marie Cooking Class
A little over a year ago, I took my first class at Tante Marie with Jodi Liano. I took The Basics (Series III) course with her, every Tuesday for 6 weeks. The focus of the class was on timing, but I also learned a lot of techniques, which had intimidated me in the past. By the time the 6 week course was finished, I was hooked on cooking classes. I waited for the next round of classes to come out, and as soon as they did, I forwarded them onto anyone I thought would be interested and started planning which classes I would take.
Last weekend I took Tante Marie's Quick and Easy Mediterranean Cooking with Jodi and got so many great recipes using lots of whole grains, which had intimidated me in the past. We made a fantastic harissa, which I can't wait to make at home (I'll share once I get a chance to make it myself). My favorite dish was the Tomato and Pesto Farrotto. Farro, often confused with wheatberry or spelt is actually emmer, which comes from the wheat family. It has a nutty taste and a similar texture to arborio, but without the gummy-ness. SO GOOD, better than risotto, in my opinion! I loved the farro so much that I made it for dinner this week and added lots of fresh veges. As an added bonus, Carl LOVED it! This will definitely be added to the rotation.
Last weekend I took Tante Marie's Quick and Easy Mediterranean Cooking with Jodi and got so many great recipes using lots of whole grains, which had intimidated me in the past. We made a fantastic harissa, which I can't wait to make at home (I'll share once I get a chance to make it myself). My favorite dish was the Tomato and Pesto Farrotto. Farro, often confused with wheatberry or spelt is actually emmer, which comes from the wheat family. It has a nutty taste and a similar texture to arborio, but without the gummy-ness. SO GOOD, better than risotto, in my opinion! I loved the farro so much that I made it for dinner this week and added lots of fresh veges. As an added bonus, Carl LOVED it! This will definitely be added to the rotation.
Side note: The farro pictured below is the brand I used, and you can find it in Whole Foods near the packaged brown rice.

(Fresh Vege) Tomato and Pesto Farrotto
Serves: 4-6
Cooking time: 60 min. (if you make it with the veges)
2 cups of farro
3 TBS extra virgin olive oil, divided
3 cups reduced-sodium vegetable or chicken broth (or water)
2 medium cloves of garlic, peeled and finely chopped
1/8 tsp crushed red pepper flakes
1 lb ripe cherry tomatoes, halved
5 TBS prepared pesto (see recipe below)
3/4 cup freshly grated Parmesan cheese
Salt and Pepper
Optional ingredients
1/2 cup zucchini, cut into 1/2 inch pieces
1/2 cup red or yellow pepper, cut into 1/2 inch pieces
1/2 cup onion, diced
1/2 cup peas (fresh or frozen)
1 cup of broccoli tops, cut into 1 inch pieces
Rinse the farro in a fine sieve. Bring a large pot of water to a boil, add farro and cook at a low boil for 15 minutes. Drain and transfer to a bowl. Stir in 1 tbs of olive oil and 1/2 tsp salt. Set aside. (the farro can be prepared and refrigerated up to 24 hours in advance).
Heat broth in a saucepan on medium-low heat. Pour remaining 2 tbs of olive oil in a 10 to 12 inch skillet and heat on medium heat. Add garlic and any "optional ingredients" except peas. Stir in crushed pepper and cook until onions are soft. Salt and pepper to taste. Fold in tomatoes and peas. Stir in farro, mixing well to coat the grains, and add a ladle of broth.
Cook the farro, stirring often to prevent sticking, and adding a ladle of broth every time the liquid is absorbed. Cook until farro is tender but still has a little bite int he center, about 20 minutes total (judge by texture and less by time). Stir in pesto and grated cheese. Taste. Add salt, pepper, more pesto, more cheese, as needed. Serve immediately.
Side note: To refresh leftovers, saute more vegetables until soft. Add leftovers, with a little stock and stir until stock is absorbed and leftovers are cooked through.
Pesto
1 handful of basil leaves
2-3 garlic cloves
3 tbs toasted pine nuts
approx 1/4 cup good olive oil
2 tsp kosher salt
1/4 - 1/2 cup of grated Parmesan cheese
In a mini food processor, chop the garlic with the salt. Add the basil leaves, 1/4 cup of Parmesan cheese and pine nuts, then puree. Drizzle olive oil into the mixture, until smooth. Periodically push the puree down the sides of the bowl and continue to puree. Taste. Add any additional ingredients to taste.
Thursday, June 4, 2009
Sunday Dinner
Last night, Carl and I had our friends J & A and their little one, S, over for Sunday dinner. During our many dinners together, we have often talked about family dinners as kids, and how in all of our homes, Sunday lunch or dinner was a requirement. In Carl and J's house, their mom's always did a Sunday roast, and in honor of that tradition, I made roasted chicken and gravy for dinner.
For some simple side dishes, I roasted potatoes (some under the chicken) and asparagus, steamed some broccoli, and sliced up some fresh bread. A simple dinner, but one that brought back memories of childhood and sitting around the table having dinner as a family.
Roasted Chicken
Serves: approx. 6
active cooking time: 15 min.
inactive cooking time: 1.5 hours
1 4-5 lb roasting chicken (air chilled for better flavor)
salt and pepper
olive oil or butter, softened
herbs (parsley, oregano, thyme, rosemary) - choose as many or as few as you like
1 lemon, cut in half
1 head of garlic, chopped in half width-wise
5-6 cloves of garlic peeled
4-5 potatoes (Yukon gold, russets, etc..) sliced in wedges or 8-10 (red potatoes, fingerling, etc..)
2-3 carrots, peeled and cut into quarters
1-2 parsnips, peeled and cut into quarters
1-2 yellow onion, cut into thick slices
Preheat oven to 425 degrees. In a large baking (preferably metal/cast iron) dish, toss together potatoes, onions, carrots, parsnips, and peeled garlic cloves with a little olive oil, salt and pepper. Spread evenly on bottom of baking dish. If the dish is too crowded, take out some of the potatoes and parsnips, and roast separately.* Set aside.
Remove giblets from chicken, and save them for making gravy. Salt and pepper cavity of the chicken. Stuff chicken with half of the lemon, half of the garlic head , herbs of choice, the other half head of garlic, and end with the other half of the lemon. Then tie together the chicken legs, which should close the cavity. Tuck wings in, or tie them to chicken. Rub the outside of chicken with butter or olive oil, I prefer butter, and salt and pepper liberally. Place chicken breast side up on top of the veges.
Put the chicken into the oven for about 1.5 hours or until the thermometer reads 160 degrees at the breast. Remove the chicken from the oven, and place on a cutting board, preferably with a moat to catch any juices that will inevitably run off, to rest with foil tee pee on top for 10 minutes. The internal temperature will continue to increase to the recommended internal temperature of 165 degrees. Check vegetables to be sure they are done. If not, put them back in the oven until finished. Now carve the chicken and plate.
Once the vegetables are done, remove them from the pan, and see recipe for gravy below for turning the drippings into gravy.
*If roasting some veges separately, 45 minutes before the chicken is done, put the extra veges in the oven with the chicken.
Chicken Gravy
Makes: 2-3 cups
giblets
thyme
bay leaf
3-4 cups of chicken broth
1/4 cup of dry white wine
1 packet of chicken gravy mix (simply organic, knorr, etc..)
salt and pepper
2 tbs. olive oil
In a sauce pan, brown giblets in olive oil. Once browned on all sides, add chicken broth, thyme, and bay leaf. Bring to a boil, then simmer while chicken is roasting. Once chicken and vegetables have finished roasting, remove vegetables from pan. Hopefully there will be some juices left over in the pan. Put pan over heat and add wine to the pan. Cook slowly, scraping the bits from the pan. Once all of the bits have been removed, add the remaining liquid to the chicken broth. Strain the broth, remove any large bits and the giblets. You should have about 3 cups of liquid. Return broth to sauce pan, then slowly whisk in gravy mix. Let simmer for 2-3 minutes. Then taste.
Salty? Add more chicken broth or water. Remember, that the salty-ness will be diluted once put on the chicken, so if it's a little salty, that's OK.
Not salty enough? Add or salt and pepper
Too much wine flavor? Add chicken broth
Too thick? Add chicken broth
ENJOY!
For some simple side dishes, I roasted potatoes (some under the chicken) and asparagus, steamed some broccoli, and sliced up some fresh bread. A simple dinner, but one that brought back memories of childhood and sitting around the table having dinner as a family.
Roasted Chicken
Serves: approx. 6
active cooking time: 15 min.
inactive cooking time: 1.5 hours
1 4-5 lb roasting chicken (air chilled for better flavor)
salt and pepper
olive oil or butter, softened
herbs (parsley, oregano, thyme, rosemary) - choose as many or as few as you like
1 lemon, cut in half
1 head of garlic, chopped in half width-wise
5-6 cloves of garlic peeled
4-5 potatoes (Yukon gold, russets, etc..) sliced in wedges or 8-10 (red potatoes, fingerling, etc..)
2-3 carrots, peeled and cut into quarters
1-2 parsnips, peeled and cut into quarters
1-2 yellow onion, cut into thick slices
Preheat oven to 425 degrees. In a large baking (preferably metal/cast iron) dish, toss together potatoes, onions, carrots, parsnips, and peeled garlic cloves with a little olive oil, salt and pepper. Spread evenly on bottom of baking dish. If the dish is too crowded, take out some of the potatoes and parsnips, and roast separately.* Set aside.
Remove giblets from chicken, and save them for making gravy. Salt and pepper cavity of the chicken. Stuff chicken with half of the lemon, half of the garlic head , herbs of choice, the other half head of garlic, and end with the other half of the lemon. Then tie together the chicken legs, which should close the cavity. Tuck wings in, or tie them to chicken. Rub the outside of chicken with butter or olive oil, I prefer butter, and salt and pepper liberally. Place chicken breast side up on top of the veges.
Put the chicken into the oven for about 1.5 hours or until the thermometer reads 160 degrees at the breast. Remove the chicken from the oven, and place on a cutting board, preferably with a moat to catch any juices that will inevitably run off, to rest with foil tee pee on top for 10 minutes. The internal temperature will continue to increase to the recommended internal temperature of 165 degrees. Check vegetables to be sure they are done. If not, put them back in the oven until finished. Now carve the chicken and plate.
Once the vegetables are done, remove them from the pan, and see recipe for gravy below for turning the drippings into gravy.
*If roasting some veges separately, 45 minutes before the chicken is done, put the extra veges in the oven with the chicken.
Chicken Gravy
Makes: 2-3 cups
giblets
thyme
bay leaf
3-4 cups of chicken broth
1/4 cup of dry white wine
1 packet of chicken gravy mix (simply organic, knorr, etc..)
salt and pepper
2 tbs. olive oil
In a sauce pan, brown giblets in olive oil. Once browned on all sides, add chicken broth, thyme, and bay leaf. Bring to a boil, then simmer while chicken is roasting. Once chicken and vegetables have finished roasting, remove vegetables from pan. Hopefully there will be some juices left over in the pan. Put pan over heat and add wine to the pan. Cook slowly, scraping the bits from the pan. Once all of the bits have been removed, add the remaining liquid to the chicken broth. Strain the broth, remove any large bits and the giblets. You should have about 3 cups of liquid. Return broth to sauce pan, then slowly whisk in gravy mix. Let simmer for 2-3 minutes. Then taste.
Salty? Add more chicken broth or water. Remember, that the salty-ness will be diluted once put on the chicken, so if it's a little salty, that's OK.
Not salty enough? Add or salt and pepper
Too much wine flavor? Add chicken broth
Too thick? Add chicken broth
ENJOY!
Tuesday, May 26, 2009
Always a hit - Appetizer
Last year, I took the Basics 3 class at Tante Marie every Tuesday for 4 hours. It lasted 6 weeks and at the end of every meal we had a family dinner with wine. In each class we made 10-12 dishes including appetizers, main courses, and desserts. Each class focused on a different region, and I ended up with a healthy stack of recipes for any occasion. I have used my Tante Marie recipes over and over again, and have found that my favorite dish to make (because it's always a hit) is the Wild Mushroom and Gruyere Tart.
The recipe I was given is for a large tart which I cut into individual servings and is served with an herb salad, which I have served once for a dinner party. The next time I made the tart, I decided to cut the dough into quarters and make individual sized tarts. The more I made it, the smaller I went. Finally, I made them bite-sized.... When making them bite-sized, I skipped the egg-wash. It's not needed. The bite sized tarts are VERY time consuming. Beware....
The last time I made them, I used a biscuit cutter and made them round. This is my favorite method. They were neat and beautiful. Going forward, I will make them round and cut them into quarters if I want them as a hors d'oeuvres
The key to the recipe is the mushroom mixture. Definitely try this before putting the tart together.
Enjoy!!
The recipe I was given is for a large tart which I cut into individual servings and is served with an herb salad, which I have served once for a dinner party. The next time I made the tart, I decided to cut the dough into quarters and make individual sized tarts. The more I made it, the smaller I went. Finally, I made them bite-sized.... When making them bite-sized, I skipped the egg-wash. It's not needed. The bite sized tarts are VERY time consuming. Beware....
The last time I made them, I used a biscuit cutter and made them round. This is my favorite method. They were neat and beautiful. Going forward, I will make them round and cut them into quarters if I want them as a hors d'oeuvres
The key to the recipe is the mushroom mixture. Definitely try this before putting the tart together.
Enjoy!!
Monday, May 11, 2009
Saturday night dinner
The first time we went to Babbo's 4 years ago, I fell in love with wild boar ragu. The richness of the sauce, the gaminess of the meat, it was heaven. I'm not sure what convinced me to try making it for the first time, but I end up buying both the Babbo cookbook and Mario Batali's Molto Italiano, both of which had recipes for wild boar ragu. I followed the Molto Italiano recipe to a tee and found that it tasted a lot more like the wine I used than I would have liked. Then I started to blend the 2 recipes and found that it tasted too much like tomato sauce. After many iterations, some better than others, I finally have a recipe that I like.
Disclaimer: I have only made this version of the ragu once and I am writing down the recipe by memory. A lot of the measurements are approximations. I highly recommend tasting at the various stages to make sure everything is seasons properly.
And with that, here it is...
Wild Boar Ragu
approx. 8 servings
active cooking time: 1-1.5 hours
inactive cooking time: 3-4 hours
2.5-3 lbs of wild boar shoulder, divide in 2
.25 - .5 lb pancetta, chopped
1 carrot, fine dice
1 stalk celery, fine dice
1 medium yellow onion, fine dice
1-1.5 cups dry white wine
3 cups of tomato sauce (see Pizza Post)
1 16 oz. can of whole tomatoes, roughly chopped
1 qt. brown chicken stock
1 tablespoon beef bullion
1 bay leaf
Pinch of sugar as needed
Salt and pepper to taste
1 cup flour
2-3 TBS olive oil
Trim some of the fat off of the boar. Cut half of the wild boar shoulder [boar] into 1/2" cubes, slightly smaller than if you were making stew. The pieces do not need to be the same size. Mince the other half of the boar in the food processor and set aside.
In a large dutch oven heat 2-3 TBS of olive oil (enough to coat the bottom of the pan) on medium/high heat.
On a plate mix flour and 2-3 TBS of salt and 1-2 TBS of pepper. Coat cubed boar in flour mixture. Brown the meat. To determine when to turn the meat, you will notice that it has stopped sticking to the bottom of the pan. This is the point when there is a good crust built on the outside. If it is continues to stick, continue to cook it longer on that side. This method can be applied to any piece of meat. If the pan starts to get crowded, brown the boar in as many batches as it takes. Once the cubed boar is finished browning, set aside.
Do not turn the heat off on the pan. There will be bits from the browning stuck to the bottom of the pan. Don’t worry about it, that’s normal. Add 1/3 of the chopped pancetta to the pan. Saute on medium to low heat, allowing the fat to render, 4-5 minutes. Turn up the heat to medium/high and add minced boar to the pan. Salt and pepper lightly (the pancetta is already salty). This will add flavor to the minced meat. Cook the meat about 80% of the way through. It will have extra time to cook later. If you accidentally cook it all the way through, don’t fret, it won’t ruin anything. Once the minced boar is finished, take out of the pan and set aside.
You’ll notice at this point that the majority of the bits are gone from the bottom of the pan. Turn heat down to medium/low. Add the rest of the chopped pancetta, and let the fat render, 4-5 minutes. Add celery, carrots, and onions. Season lightly with salt and pepper. Sauté until soft, 4-5 minutes, then add garlic. Sauté for another 1-2 minutes. Taste. You want to make sure the base flavors are well seasoned or they will lack flavor in the final product. Season as needed.
Add the cubed boar to the pan with the vegetables and mix well. Add wine. Bring to boil and simmer until evaporated. Add tomatoes, tomato paste, tomato sauce, ½ of the chicken broth, ½ of the beef bouillon, oregano and bay leaf. Mix well, bring to a boil and simmer. Simmer for 1 hour. Taste.
What does it taste like?
Too tart? Add a pinch of sugar.
Tomato-ey? Add more chicken stock. (This may require a longer cooking time)
Too much wine? Add tomato sauce or paste.
Lacks richness? Add tsp of beef bullion (remember, beef bullion is super salty)
Add in small amounts. You can always add, but it’s hard to take away.
Simmer for another 2-3 hours. Stir every 30-45 minutes. If the sauce starts to thicken too much, add chicken broth. If you don’t have another 3 hours, another hour will do, just don’t add as much chicken stock. Keep in mind, the longer you cook the sauce, periodically adding chicken broth, the richer the sauce will taste and the softer the meat will be. You can over cook the meat, so I wouldn't recommend cooking it for longer than 4-5 hours. Taste periodically, it’ll make all the difference.
This is best served over fresh tagliatelle or other wide pasta.
Enjoy!!
Disclaimer: I have only made this version of the ragu once and I am writing down the recipe by memory. A lot of the measurements are approximations. I highly recommend tasting at the various stages to make sure everything is seasons properly.
And with that, here it is...
Wild Boar Ragu
approx. 8 servings
active cooking time: 1-1.5 hours
inactive cooking time: 3-4 hours
2.5-3 lbs of wild boar shoulder, divide in 2
.25 - .5 lb pancetta, chopped
1 carrot, fine dice
1 stalk celery, fine dice
1 medium yellow onion, fine dice
1-1.5 cups dry white wine
3 cups of tomato sauce (see Pizza Post)
1 16 oz. can of whole tomatoes, roughly chopped
1 qt. brown chicken stock
1 tablespoon beef bullion
1 bay leaf
Pinch of sugar as needed
Salt and pepper to taste
1 cup flour
2-3 TBS olive oil
Trim some of the fat off of the boar. Cut half of the wild boar shoulder [boar] into 1/2" cubes, slightly smaller than if you were making stew. The pieces do not need to be the same size. Mince the other half of the boar in the food processor and set aside.
In a large dutch oven heat 2-3 TBS of olive oil (enough to coat the bottom of the pan) on medium/high heat.
On a plate mix flour and 2-3 TBS of salt and 1-2 TBS of pepper. Coat cubed boar in flour mixture. Brown the meat. To determine when to turn the meat, you will notice that it has stopped sticking to the bottom of the pan. This is the point when there is a good crust built on the outside. If it is continues to stick, continue to cook it longer on that side. This method can be applied to any piece of meat. If the pan starts to get crowded, brown the boar in as many batches as it takes. Once the cubed boar is finished browning, set aside.
Do not turn the heat off on the pan. There will be bits from the browning stuck to the bottom of the pan. Don’t worry about it, that’s normal. Add 1/3 of the chopped pancetta to the pan. Saute on medium to low heat, allowing the fat to render, 4-5 minutes. Turn up the heat to medium/high and add minced boar to the pan. Salt and pepper lightly (the pancetta is already salty). This will add flavor to the minced meat. Cook the meat about 80% of the way through. It will have extra time to cook later. If you accidentally cook it all the way through, don’t fret, it won’t ruin anything. Once the minced boar is finished, take out of the pan and set aside.
You’ll notice at this point that the majority of the bits are gone from the bottom of the pan. Turn heat down to medium/low. Add the rest of the chopped pancetta, and let the fat render, 4-5 minutes. Add celery, carrots, and onions. Season lightly with salt and pepper. Sauté until soft, 4-5 minutes, then add garlic. Sauté for another 1-2 minutes. Taste. You want to make sure the base flavors are well seasoned or they will lack flavor in the final product. Season as needed.
Add the cubed boar to the pan with the vegetables and mix well. Add wine. Bring to boil and simmer until evaporated. Add tomatoes, tomato paste, tomato sauce, ½ of the chicken broth, ½ of the beef bouillon, oregano and bay leaf. Mix well, bring to a boil and simmer. Simmer for 1 hour. Taste.
What does it taste like?
Too tart? Add a pinch of sugar.
Tomato-ey? Add more chicken stock. (This may require a longer cooking time)
Too much wine? Add tomato sauce or paste.
Lacks richness? Add tsp of beef bullion (remember, beef bullion is super salty)
Add in small amounts. You can always add, but it’s hard to take away.
Simmer for another 2-3 hours. Stir every 30-45 minutes. If the sauce starts to thicken too much, add chicken broth. If you don’t have another 3 hours, another hour will do, just don’t add as much chicken stock. Keep in mind, the longer you cook the sauce, periodically adding chicken broth, the richer the sauce will taste and the softer the meat will be. You can over cook the meat, so I wouldn't recommend cooking it for longer than 4-5 hours. Taste periodically, it’ll make all the difference.
This is best served over fresh tagliatelle or other wide pasta.
Enjoy!!
Tuesday, April 28, 2009
Pizza with Friends
As much as I love to cook for my friends, cooking WITH my friends is always a laugh, and Saturday night was no different. Debbie and I, after taking a pizza making class a few weeks ago, decided we would make pizzas for Ladies Poker Night at, our friend, Sharon's house. Since we had some trouble with the store bought pizza dough in class (from Trader Joe's) and found working with homemade dough much easier, we opted to make our own dough, which meant heading over to Sharon's early to get the dough rising, and ingredients cut.


Basic Pizza Dough
From Cooks Boulevard cooking class
2 personal sized pizzas

We used the recipe from our pizza making class, listed below, which we found easy to make and work with. We started around 4pm, making 4 batches of dough, since there would be 8 people coming over (each batch of dough made 2 personal pizzas). Thankfully all of our yeast was alive and active, which kept us on target for the party. Once the yeast was activated, after about 4-5 minutes, we slowly mixed it into the flour mixture until it was combined. We then floured our boards and hands and started kneading. From there we let the dough rest, and had a well earned glass (or 2) of wine.
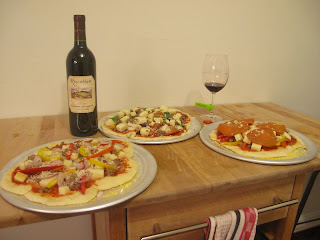
After the dough had risen, we started the prep work. We had cheese, peppers, garlic, mushrooms, shallots, olives, sweet Italian sausage, and pepperoni to prepare. Once it was all sliced, chopped, cooked, and organized in an assembly line fashion, we started arranging our pizzas. I had remembered that rolling out the dough was not easy, but needless to say, I didn't think it would be THIS difficult. We had a lot of trouble making the dough round...
But regardless of the shape, they all tasted oh so good. The crust was crispy and light, and the toppings were cooked to perfection. At the end of the night, we all voted that Debbie's pizza with garlic, shallots, mozzarella and Parmesan cheeses, a pinch of salt and a drizzle of olive oil, was the best of the bunch. . Here it is before it went in the oven..

Needless to say, I do not have an after photo, since we were all too busy eating the pizza to remember to take a photo.. Whoops... :-)
As always there are lessons learned when cooking. Here are ours..
1. Do not knead the dough for a 3rd time before rolling it out. It condenses too much and makes it even more difficult to get into a beautiful round shape.
2. Sprinkle a bit of good olive oil over the pizza to give it a nice sheen and flavor
3. Finely chopped garlic is a fabulous addition to ANY pizza.
4. Put basil leaves on the pizza AFTER you bake it, not before.
5. If you are cooking your pizza on a pizza stone, assemble pizza on the pizza peel with a lot of cornmeal to ensure the dough dough does not stick when trying to put it in the oven.
6. If you are cooking your pizza on a pizza pan, be sure to use plenty of cornmeal on the pan prior to putting your pizza dough on it, or it will stick to the pan once it's finished.
Here are some more photos from our pizza making experience....
Basic Pizza Dough
From Cooks Boulevard cooking class
2 personal sized pizzas
Ingredients
1 package active dry yeast
3/4 cup warm water, about 110 degrees F
1 teaspoon sugar
1 tablespoon extra-virgin olive oil
1 3/4 cups all-purpose flour,plus extra for kneading
1 teaspoon salt
Instructions
In a small mixing bowl, whisk together yeast, warm water, sugar and olive oil. Let sit for about 3 minutes to fully dissolve and activate the yeast. In a large mixing bowl, whisk together flour and salt. With a rubber spatula, gradually mix the yeast mixture into the flour until just combined and dough barely holds together.
Turn the dough out onto a clean counter surface dusted with flour. Knead the dough with flour-dusted hands until the dough has become smooth and elastic, about 10 minutes. The surface should be tight and silky and bounce back slightly when pressed. Lightly grease a large mixing bowl with olive oil and place the dough in it. Cover the bowl tightly with plastic wrap and set in a warm place to rise until doubled in size, 1 to 2 hours.
Once doubled, punch the dough down and divide it into 2 equal pieces. Knead each 1 slightly to form a uniform ball. Set aside and cover them with a kitchen towel or plastic wrap to rest for 30 minutes.
Note: Dough can be made the day before and refrigerated overnight once it is divided. Keep covered tightly in plastic wrap or in a sealed food storage bag.
Variations: Whole wheat dough: Replace 3/4 c of the four with whole wheat flour. Garlic and herb dough: Add 1 tsp dried basil, 1 tsp dried oregano, and 1/2 tsp granulated garlic to the flour mixture
Marinara Sauce
From Cooks Boulevard cooking class
Ingredients:
2 tablespoons extra-virgin olive oil
3 large cloves garlic, minced
4 cups tomato puree
1 tablespoon chopped fresh Italian parsley leaves
1 large fresh basil stem with leaves removed
1 teaspoon sea salt, preferably gray salt
Pinch light brown sugar
Heat the olive oil in a large non-reactive pot over moderate heat. Add the garlic and saute until caramelized, about 5 minutes. Add the tomatoes to the garlic and bring to a simmer. Add sugar. Add the parsley and basil and simmer until reduced to a sauce-like consistency, about 15 minutes. Remove the basil stem before serving.
Wednesday, April 22, 2009
Gravlax or smoked salmon?
Technically, they are not the same thing, but their names are often used interchangeably. I quickly found this out when searching for a recipe to make my own smoked salmon and kept coming across recipes that used "smoked salmon" as an ingredient, but not how to make it on my own. Then Chow.com published an article on Gravlax v. Lox and accompanied it with a recipe on cured salmon by Traci Des Jardins. Perfect timing!
After searching through tons of sites and my cookbooks at home, I picked a recipe and started curing. I decided to try Traci's recipe first, as it was the most basic. Helpful Hint: When perfecting a new recipe, try a basic recipe first. Once you are comfortable with that recipe, read through other recipes to get ideas on how you would like to make it your own. For suggestions on making changes to your recipe, check the comments section on recipe websites. For this recipe I used wild, previously frozen coho salmon. It's the wild salmon that always seems to be at Whole Foods, and it was even on sale this week. YAY! When I made Traci's recipe, I found it to be a little sweet for my liking, which may be from packing it in the salt/sugar mixture, and I couldn't taste the meyer lemon I had bought especially for the occasion (boo). One step I found that is key, REMOVE THE PIN BONES. I was lazy and didn't do this, and wasn't able to get nice, thin slices.
For my next batch, I used Alice Waters gravlax recipe from her Chez Panisse Cafe Cookbook. This recipe called for A LOT less sugar and salt, still in a one-to-one ratio, which I think helped it to be less sweet. It also called for all-spice and dill, but I think the ratio of all-spice to the salt/sugar mixture was too much and it over powered the salmon, especially the tail end. Lesson learned, always use the center cut. The tail-end peices cure way too fast. I did take out the pin bones this time, though, and it made a hug difference when slicing it. I also had issues with weighting the salmon. I used a baking dish on top of the salmon and found that the weight was not evenly distributed, so the texture was not consistent across the fish. Another lesson learned.
My latest batch, which I started on Sunday, I mixed both of the above recipes to come up with my own.
Ingrdients:
3 TBS of salt
3 TBS of sugar
zest of 1 lemon
1 TBS of crush white peppercorns
3 stems of dill
1.5 lbs of center cut wild coho salmon cut in half
Mix the first 4 ingredients well, then sprinkle 1/4 of the mixture on the bottom of the dish. Put the first piece of salmon on top, skin side down. Rub a 1/4 of the mixture on top of the salmon. Put the dill sprigs on top. Then rub 1/4 of the mixture on the flesh side of the other peice of salmon and quickly put it flesh side down on top of the dill. There should be enough moisture in the salmon that the mixture should stick. Rub the remaining mixture on the skin side and rub extra mixture into the sides of the salmon so that every inch was covered. Cover the top of the salmon closely with plastic wrap. To add pressure and weight to the top of the salmon, I used a ziplock bag of rice and stacked a couple of cans on top of that. I find that rice is good because it forms around the salmon and the weight is more evenly distributed. Let this sit in the fridge for 24 hours. Drain any additional liquid that has come off the salmon, and flip the salmon over, so the piece that was on top, is now on the bottom. Let the salmon sit in the fridge for another 24 hours. At this point, drain off any additional liquid, and rinse of the mixture. Pat dry and the slice to serve.
I took this batch out of the fridge last night, and I have officially decided that I am curing my salmon too long. It still tasted a too sweet on the outside, but was just right on the inside. On a positive note, I really enjoyed the lemon-y flavor, which the first 2 batches did not have. Next time, I will be curing it for less time, but with the same recipe. I'll keep you posted...
After searching through tons of sites and my cookbooks at home, I picked a recipe and started curing. I decided to try Traci's recipe first, as it was the most basic. Helpful Hint: When perfecting a new recipe, try a basic recipe first. Once you are comfortable with that recipe, read through other recipes to get ideas on how you would like to make it your own. For suggestions on making changes to your recipe, check the comments section on recipe websites. For this recipe I used wild, previously frozen coho salmon. It's the wild salmon that always seems to be at Whole Foods, and it was even on sale this week. YAY! When I made Traci's recipe, I found it to be a little sweet for my liking, which may be from packing it in the salt/sugar mixture, and I couldn't taste the meyer lemon I had bought especially for the occasion (boo). One step I found that is key, REMOVE THE PIN BONES. I was lazy and didn't do this, and wasn't able to get nice, thin slices.
For my next batch, I used Alice Waters gravlax recipe from her Chez Panisse Cafe Cookbook. This recipe called for A LOT less sugar and salt, still in a one-to-one ratio, which I think helped it to be less sweet. It also called for all-spice and dill, but I think the ratio of all-spice to the salt/sugar mixture was too much and it over powered the salmon, especially the tail end. Lesson learned, always use the center cut. The tail-end peices cure way too fast. I did take out the pin bones this time, though, and it made a hug difference when slicing it. I also had issues with weighting the salmon. I used a baking dish on top of the salmon and found that the weight was not evenly distributed, so the texture was not consistent across the fish. Another lesson learned.
My latest batch, which I started on Sunday, I mixed both of the above recipes to come up with my own.
Ingrdients:
3 TBS of salt
3 TBS of sugar
zest of 1 lemon
1 TBS of crush white peppercorns
3 stems of dill
1.5 lbs of center cut wild coho salmon cut in half
Mix the first 4 ingredients well, then sprinkle 1/4 of the mixture on the bottom of the dish. Put the first piece of salmon on top, skin side down. Rub a 1/4 of the mixture on top of the salmon. Put the dill sprigs on top. Then rub 1/4 of the mixture on the flesh side of the other peice of salmon and quickly put it flesh side down on top of the dill. There should be enough moisture in the salmon that the mixture should stick. Rub the remaining mixture on the skin side and rub extra mixture into the sides of the salmon so that every inch was covered. Cover the top of the salmon closely with plastic wrap. To add pressure and weight to the top of the salmon, I used a ziplock bag of rice and stacked a couple of cans on top of that. I find that rice is good because it forms around the salmon and the weight is more evenly distributed. Let this sit in the fridge for 24 hours. Drain any additional liquid that has come off the salmon, and flip the salmon over, so the piece that was on top, is now on the bottom. Let the salmon sit in the fridge for another 24 hours. At this point, drain off any additional liquid, and rinse of the mixture. Pat dry and the slice to serve.
I took this batch out of the fridge last night, and I have officially decided that I am curing my salmon too long. It still tasted a too sweet on the outside, but was just right on the inside. On a positive note, I really enjoyed the lemon-y flavor, which the first 2 batches did not have. Next time, I will be curing it for less time, but with the same recipe. I'll keep you posted...
Friday, April 17, 2009
The Sunshine is Here Again!!
This weekend is supposed to be hot and sunny in San Francisco, and you know what that means. BBQ's, which means parties and potlucks. I have an easy recipe to share, which Amanda kindly reminded me of today, and it's one of my favorite pasta salad recipes. The chopping of the vegetables is a little tedious, but once that's done, the rest is easy as pie. The best part is, you can make this ahead of time which makes it great for potlucks and parties.
This recipe is from Ina Garten (Barefoot Contessa).. I have made a few notes, in orange, of ways I have adapted this for my parties, based on different items I had in my fridge at the time. The great part about this recipe is that it's a great starter recipe. You can make lots of changes depending on what's in season, the vegetables and herbs and cheese you like best.. It's hard to ruin this one and it always goes at a party.. Of course, that could be because I eat it all. Enjoy!
Orzo with Roasted Vegetables
Prep Time: 20 min.
Inactive Prep Time: 1 hour
Cook Time: 40 min.
Serves: 6 servings More like 8 as a side dish
Ingredients
1 small eggplant, peeled and 3/4-inch diced
1 red bell pepper, 1-inch diced
1 yellow bell pepper, 1-inch diced
1 red onion, peeled and 1-inch diced
2 garlic cloves, minced
1/3 cup good olive oil
1 1/2 teaspoons kosher salt
1/2 teaspoon freshly ground black pepper
1/2 pound orzo or rice-shaped pasta
2 tomatoes, seeded and 1/2-inch dice - it adds a nice freshness to the salad
sun-dried tomotoes chopped
For the dressing:
1/3 cup freshly squeezed lemon juice (2 lemons)
1/3 cup good olive oil - The key is good olive oil
1 teaspoon kosher salt
1/2 teaspoon freshly ground black pepper
To assemble:
4 green onions, minced (white and green parts)
1/4 cup pignolis (pine nuts), toasted - I always forget to do this, but it does add a nice crunch
3/4 pound good feta, 1/2-inch diced (not crumbled) - mozzerella would also work
15 fresh basil leaves, cut into julienne
1/2 bunch of italian parsley chopped
Directions
Preheat the oven to 425 degrees F.
Toss the eggplant, bell peppers, onion, and garlic with the olive oil, salt, and pepper on a large sheet pan. Roast for 40 minutes, until browned, turning once with a spatula.
Meanwhile, cook the orzo in boiling salted water for 7 to 9 minutes, until tender. Drain and transfer to a large serving bowl. Add the roasted vegetables to the pasta, scraping all the liquid and seasonings from the roasting pan into the pasta bowl.
For the dressing, combine the lemon juice, olive oil, salt, and pepper and pour on the pasta and vegetables. Make this while the orzo is cooking, and be sure to toss the dressing with the orzo while it is still warm. This will allow the pasta to soak up some of the dressing. Let cool to room temperature, then add the scallions, pignolis, feta, and basil. Check the seasonings, and serve at room temperature. This is best served room temperature. The flavors get a bit muted if it's too cold.
Here's the link if you would like some additional suggestions on making this pasta. Thank you Food Network! http://www.foodnetwork.com/recipes/ina-garten/orzo-with-roasted-vegetables-recipe/index.html
Have a great weekend.. Enjoy the sunshine!
This recipe is from Ina Garten (Barefoot Contessa).. I have made a few notes, in orange, of ways I have adapted this for my parties, based on different items I had in my fridge at the time. The great part about this recipe is that it's a great starter recipe. You can make lots of changes depending on what's in season, the vegetables and herbs and cheese you like best.. It's hard to ruin this one and it always goes at a party.. Of course, that could be because I eat it all. Enjoy!
Orzo with Roasted Vegetables
Prep Time: 20 min.
Inactive Prep Time: 1 hour
Cook Time: 40 min.
Serves: 6 servings More like 8 as a side dish
Ingredients
1 small eggplant, peeled and 3/4-inch diced
1 red bell pepper, 1-inch diced
1 yellow bell pepper, 1-inch diced
1 red onion, peeled and 1-inch diced
2 garlic cloves, minced
1/3 cup good olive oil
1 1/2 teaspoons kosher salt
1/2 teaspoon freshly ground black pepper
1/2 pound orzo or rice-shaped pasta
2 tomatoes, seeded and 1/2-inch dice - it adds a nice freshness to the salad
sun-dried tomotoes chopped
For the dressing:
1/3 cup freshly squeezed lemon juice (2 lemons)
1/3 cup good olive oil - The key is good olive oil
1 teaspoon kosher salt
1/2 teaspoon freshly ground black pepper
To assemble:
4 green onions, minced (white and green parts)
1/4 cup pignolis (pine nuts), toasted - I always forget to do this, but it does add a nice crunch
3/4 pound good feta, 1/2-inch diced (not crumbled) - mozzerella would also work
15 fresh basil leaves, cut into julienne
1/2 bunch of italian parsley chopped
Directions
Preheat the oven to 425 degrees F.
Toss the eggplant, bell peppers, onion, and garlic with the olive oil, salt, and pepper on a large sheet pan. Roast for 40 minutes, until browned, turning once with a spatula.
Meanwhile, cook the orzo in boiling salted water for 7 to 9 minutes, until tender. Drain and transfer to a large serving bowl. Add the roasted vegetables to the pasta, scraping all the liquid and seasonings from the roasting pan into the pasta bowl.
For the dressing, combine the lemon juice, olive oil, salt, and pepper and pour on the pasta and vegetables. Make this while the orzo is cooking, and be sure to toss the dressing with the orzo while it is still warm. This will allow the pasta to soak up some of the dressing. Let cool to room temperature, then add the scallions, pignolis, feta, and basil. Check the seasonings, and serve at room temperature. This is best served room temperature. The flavors get a bit muted if it's too cold.
Here's the link if you would like some additional suggestions on making this pasta. Thank you Food Network! http://www.foodnetwork.com/recipes/ina-garten/orzo-with-roasted-vegetables-recipe/index.html
Have a great weekend.. Enjoy the sunshine!
Subscribe to:
Posts (Atom)


 Posts
Posts

